UPDATE: This method is a bit hacky, and breaks with updates – best to check on my newer method here
Wow this was harder than it should have been, so I’ll post what I can here to help you also.
We have 3 x Makerbot Replicator 2 3D printers, and for years used Makerware until it was discontinued for our printers and for Ubuntu it seems. So we’ve made the switch to Cura where all the cool kids hang out.
Of course Cura is primarily made for Ultimaker printers, but it can be configured for many others.
First up, I’m using it in Ubuntu Linux (18.04) so locations of files might need to be changed for your config files as needed.
Step 1: Set up your printer
I chose Makerbot Replicator from the printers page, and made a couple of changes as shown here:
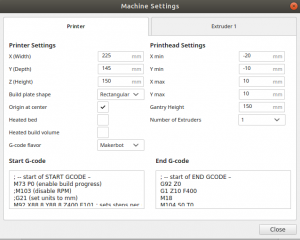
I also renamed the machine name to “Replicator 2” just so I would remember.
Step 2: Start and end GCode
You’ll need some custom Gcode so here it is (picked from various places and organised after some testing).
Start Gcode:
; — start of START GCODE –
M73 P0 (enable build progress)
;this next line won’t work, but has the steps command
M92 X88.8 Y88.8 Z400 E101 ; sets steps per mm for Rep2
G90 (set positioning to absolute)
(**** begin homing ****)
G162 X Y F4000 (home XY axes maximum)
G161 Z F3500 (home Z axis minimum)
G92 Z-5 (set Z to -5)
G1 Z0.0 (move Z to “0”)
G161 Z F100 (home Z axis minimum)
M132 X Y Z A B (Recall stored home offsets for XYZAB axis)
(**** end homing ****)
G92 X147 Y66 Z5
G1 X105 Y-60 Z10 F4000.0 (move to waiting position)
G130 X0 Y0 A0 B0 (Set Stepper motor Vref to lower value while heating)
G130 X127 Y127 A127 B127 (Set Stepper motor Vref to defaults)
G0 X105 Y-60 (Position Nozzle)
G0 Z0.6 (Position Height)
; — end of START GCODE –
End GCode:
; — start of END GCODE –
G92 Z0
G1 Z10 F400
M18
M104 S0 T0
M73 P100 (end build progress)
G162 X Y F3000
M18
; — end of END GCODE –
This of course all assumes you don’t have a heated bed (also makes sure it doesn’t send heated bed commands which make the machine complain).
Step 3: Install X3G file converter
Go to the “Marketplace” button at the top right of your Cura window and in the marketplace search for “X3GWriter” and install it. Restart Cura so that it comes live.
Step 4: Modify X3GWriter so that it always detects “Replicator 2”
There seems to be a problem with X3GWriter in that with the above setup it always detects the machine to be a replicator 1, which is a problem as they have different amounts of steps per mm. You’ll know this because if you have a Replicator 2 and you try to print an object, it’ll keep printing larger than it should be. I’m sure there’s another way to make it detect “Replicator 2” but in the mean time I just changed it to always be Replicator 2 as that is all I have.
Locate your plugins folder – for me it’s in /home/username/.local/share/cura/4.3/plugins (where username is your username).
Go into the X3GWriter folder (and again into it, it’s nested twice – the path for me is: /home/username/.local/share/cura/4.3/plugins/X3GWriter/X3GWriter/)
Open “X3GWriter.py” with your favourite text editor. Be careful in here, it’s a python script so you want to use spaces, not tabs to indent, and indents matter. If you destroy it you may have to just remove the plugin and install it again.
We’re looking for the line like this:
return machine if machine in X3GWriter.known_machines else None
Note again that it’s indented with spaces in front. Put a # in front of this line to comment it out so it doesn’t get read like this:
#return machine if machine in X3GWriter.known_machines else None
Now go to the next line, press space until you’re lined up with the line above and put in:
return “r2”
Save the file and close Cura, then restart it. If all is well, you’ll find you can now export files that will print properly and be read by your Replicator 2.
If you find the X3G file option has disappeared from your list, then the plugin is broken. Check your syntax in the plugin file and try again.
Finally I can use a nice slicer on Linux and hang out with the cool 3D printer kids!
After much searching and head banging, this works!!!
Thanks for the clear fix.
I cant find the x3g writer plugin in my plugins folder, its not there.
Hmmm.. What operating system are you using? Have you installed the plugin in the earlier step?
I am having the same issue with not being able to locate the plugin file even though I have downloaded the plugin and used it… windows 10, HP laptop
figured it out, its at:
C:\Users\user name\AppData\Roaming\cura\4.4\plugins\X3GWriter\X3GWriter
for me
followed the steps as mentioned. all was well but when I wanted to “save to removable drive” I got the notification that ” name ‘r2’ is not defined”. anybody that would know a way around this? thanks!
Hmmm… I’m not sure I’m sorry. Perhaps triple check your syntax in the file? Otherwise some kind of update to the plugin has futzed things a little.
Hi jonas, I’ve got a newer updated step by step without having to hack the x3Gwriter plugin on my blog here, check it out to see if that helps you
Hey thanks for sharing. Just wondering why you are using a sameller build volume? My MakerBot Replicator 2 has a X of 285mm just like the spec.
http://downloads.makerbot.com/replicator2/MakerBot_Replicator2_brochure.pdf
Hi Nicholas. I usually pull in from the edges a little as I don’t get great success right out on the tippy edge. Just something I tend to do.
Thank you for putting this all together. I’m running the latest version of Cura and one of the last FW releases for the Replicator2. When printing, the XYZ all looks good, but the material feed motor doesn’t seem to even attempt to extrude any material (nozzle at 210C, 0.15 mm layers). Anyone have any suggestions?
I’m in the same position.
I’m able to save my file in Cura as .X3G and save that on my SD card. Replicator 2 reads it. When I send it to print that file, no filament is extruded.
Hi guys, check out my updated step by step that no longer requires hacking up the x3Gwriter plugin – it may fix your problems (this was for older cura and x3Gwriter anyway). This fix should then work for future updates etc.
Hi there. I am looking to the same thing with a Replicator 2x. Do you know if there will be substantial differences to the process? Thanks!
Hi Chris, The main difference is the heated bed, it’s possible you’ll need to find the definition in the x3Gwriter plugin for the 2X, and follow my latest step by step here in the blog (not this one) which no longer requires hacking up the x3Gwriter plugin.